You can drag files directly from your computer desktop or an application window into your course.
Dragging and Dropping a file
-
Upload within an Activity
-
Drag files from your computer and release then on top of the blue arrow in the additional files area.
-
The files will appear in the Select files area and become part of the course activity
-

-
Upload into a Section
- Locate the Topic or Weekly Section where a file will be added.
- New resources are added to the botton of Sections
- Single, multiple and archive files can be dragged onto the section

Adding a file resource
- On the course homepage > click Turn Editing on
- In the section where you want the assignment to appear > click Add an activity or resource
- Click the radio button beside Forum
- Click Add


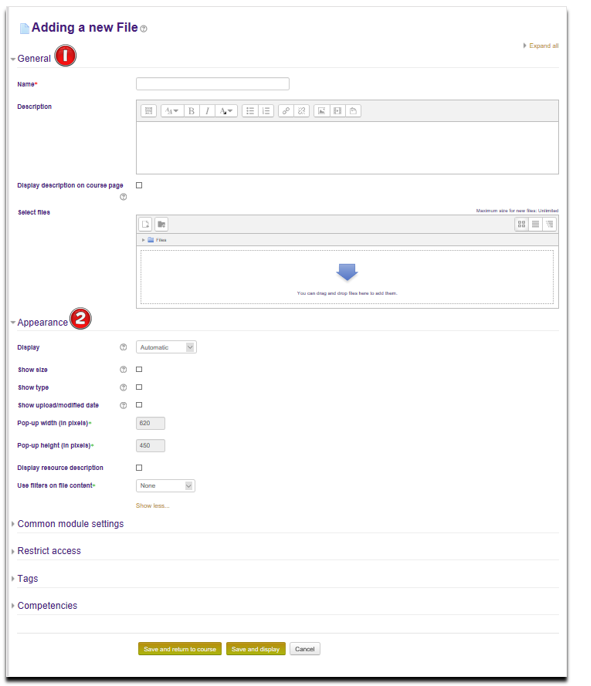
1. General Section:
-
Enter a title for the file in the Name field, which will appear as a link on the course page
-
An optional description can be added and appear on the course page if needed
2. Appearance Section:
- Select the appropriate option from the Display drop-down list to see how the file is displayed to students.
- Automatic: Moodle will determine the best display based on the file type.
- Embed: The file will be embedded in the resource's page with the Navigation and Administration block.
- Force download: The file is downloaded to the students' hard drives. Depending on individual browser settings, students may be prompted for a location to save the file.
- Open: The file will occupy the entire browser window. No browser menu, heading, footer or description will display.
- In pop-up: The file display in a new full browser window with menus and an address bar.
- Checking Show size will display the size of the uploaded file on the course page
- To show the type of file next to the file link then enable Show type
- To show the date file was uploaded enable Show upload/modified date
- Pop-up width/height would be enabled when choosing to display in pop-up
